How to use a washing machine
For many of you, one of the biggest changes involved in moving away from home is learning how to do your own washing. But how do you actually use a washing machine?

Credit: Aldeca Productions (machine), shooarts (symbols) – Shutterstock
"Students take their dirty washing with them every time they go home." It's a common stereotype, and one you've no doubt had thrown at you by your hilarious uncle.
But the truth of the matter is, these things are easy to get wrong. Accidentally chucking a red sock in with your white clothes, or shrinking your favourite jumper after washing it on the wrong setting is a classic fresher mistake. Honestly, nobody would blame you if you're a little apprehensive about doing your own washing for the first time.
So, to help you become the master of your washing machine and save money in the process, we've put together everything you need to know, including what settings to use and what the symbols on clothes labels mean.
What's in this guide?
Using your washing machine
Before we get started, it's important to note that most of the information in this guide covers home washing machines. The services at a laundrette or in the facilities at your uni will work a little differently, so some of these tips may not apply.
That said, if your uni uses Circuit, they've got a great guide on their website showing you how to use their machines.
Otherwise, using your washing machine is a pretty simple task. In most cases, there are just a few steps:
- Turn the machine on
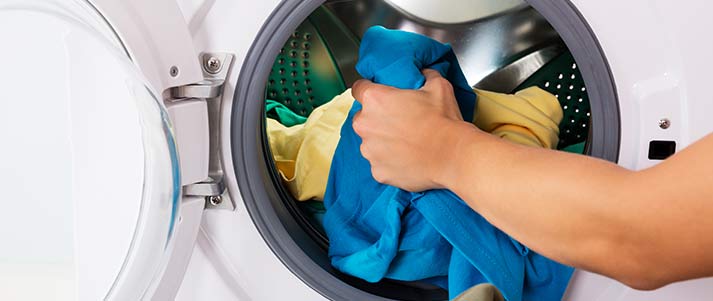
- Put your dirty washing into the machine
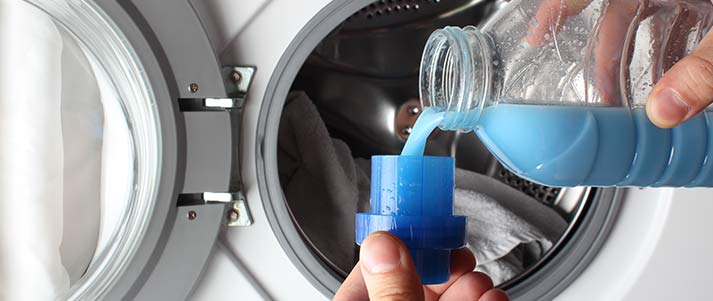
- Add your detergent (and softener if you're using it)
- Close the door
- Select your cycle and press start.
Of course, there's sometimes a little more to it than that (particularly with steps three and five, which we'll cover as we go on). But, fundamentally, using your washing machine is a very simple task and it's certainly nothing to be worried about.
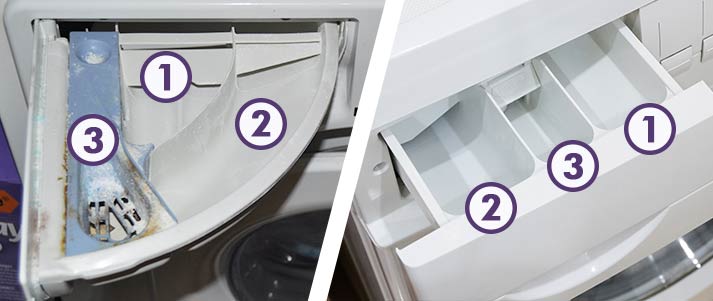
Washing machine drawer with three compartments

Credit (right): Elena Loginova – Shutterstock
A poll in our Facebook group found that 63% of students don't know what each washing machine compartment is used for. But it's not just students who struggle. Plenty of fully-fledged adults don't know either, including some members of the Save the Student team (who shall remain nameless...).
So, where do you put washing powder in a washing machine?
Using the numbered images above, we're about to clear up the confusion. Here's what each compartment in your washing machine drawer is for:
- Pre-wash – It's pretty rare that you'd actually need to use this drawer, as it's only intended for heavily soiled items. If you're running a cycle with a pre-wash, put detergent in here as well as in compartment two. That way, your clothes are basically being washed twice.
- Detergent – This is the big one, in every sense. Firstly, you should always use detergent to wash your clothes. Secondly, the detergent compartment drawer is almost always the biggest of the three, making it fairly simple to identify.
- Fabric conditioner – The fabric softener compartment is usually the easiest to spot, as it'll often be a different shape or colour to the others (like in the picture of our slightly dirty-looking machine above). It may also have a little symbol on it, like a flower.
On the off chance that your washing machine's drawer doesn't look like either of the ones we've pictured above, the compartments should have the numbers etched onto them, which should match up to the ones we've listed above.
Of course, what should be true and what is true doesn't always align. So, just to be doubly sure, have a look at your washing machine's manual (if you can't find it, you can find a digital manual – the make and model will be written on the front of your machine).
And, failing all of that, you could just stick with washing capsules. These little things go straight into the drum with your clothes, so you don't need to worry about which compartments to use (unless you want to use softener, but that slot is pretty easy to identify!).
You could even use a washing ball, although the jury's still out in terms of how well they actually work, and most people seem to agree that they struggle to deal with smelly clothes.
Do you need fabric softener?
We've spoken a lot about where to put fabric softener (a.k.a. fabric conditioner – they're the same thing), but do you actually need to use it?
The truth is, there is no right or wrong answer. If you can't cope without soft clothes and bedding, then fabric conditioner is a must. If you're not fussed, then it's definitely not essential.
Some clothes labels (especially on jeans) will specifically tell you not to use fabric softener, and if you want them to retain their colour and condition for as long as possible, it's best to follow this advice.
As for towels? That's an even murkier area. Some people can't stand a hard, abrasive towel, but in this state, it's actually more absorbent than a towel that's consistently been washed with fabric softener. A soft towel will still do a decent enough job of drying you though, so it's really just a matter of personal preference.
How to wash clothes, bedsheets and towels

Credit: Sergey Lapin – Shutterstock
Ok, so you've got to grips with how to run a cycle on your washing machine, and you know where to put your detergent and fabric softener.
But what about the seemingly hundreds of different settings you can use? And how are you supposed to know what can be washed together, and what can't?
Allow us to explain all – here are the best ways to wash clothes, bedding and towels in a washing machine:
What setting should you use on your washing machine?
For the most part, you should be able to wash your clothes on a standard 30°C – 40°C cycle. This might be labelled as 'mixed wash' or 'mixed colours', but if you're unsure, check your machine's manual.
And when we say "the most part", we mean it. Improvements in colder wash cycles, plus the availability of things like Colour Catchers, mean that you don't always have to separate whites and coloured items.
Better still, you could use one of your washing machine's eco settings. As we explain below, eco-wash settings use less energy and less water too.
However, if you want your clothes to stay whiter than white, or you're trying to remove a stain, separating whites from colours can help. And to maintain that crystal white look, you can't go wrong with a bit of Vanish powder (which goes in the detergent slot).
For more specific guidance on how to wash individual pieces of clothing, bedding and towels, you should refer to the label on each item. Those little circles and squares are all the information you need, and here's how to decipher them:
What do the symbols on clothes labels mean?
| Symbol* | Meaning | Variations and extra meanings |
|---|---|---|
 | The item is machine washable and can be spun/rinsed as normal | - One line beneath the tub means spin speed should be reduced - Two lines means a gentle/wool cycle should be used - A hand in the tub means you should hand wash the item - A cross through the tub means you shouldn't wash the item. |
| This indicates what temperature the item should be washed at | As above, plus: - Suggested temperatures range from as low as 30°C to as high as 90°C. |
|
| You can safely use bleaching agents on the item | - Diagonal lines inside the triangle mean you should only use a non-chlorine, colour-safe bleach - A cross through the triangle means you should never bleach the item. |
|
| The item can be ironed at any temperature | - Dots inside the symbol indicate the setting you should use on your iron: one dot for the wool/silk setting, two for synthetic, three for linen/cotton - A cross through the symbol means the item shouldn't be ironed - A cross through the symbol and lines coming from the bottom means you should dry iron, not steam iron. |
|
| The item can be dry cleaned | This symbol varies a bit, but mostly to give instructions to the dry cleaner. The only one you need to know is that a cross through the circle means it can't be dry cleaned. | |
| The item can be tumble dried | - Dots inside the circle indicate the temperature at which the item should be tumble dried: one dot for low, two for medium, three for high - A cross over the symbol means you shouldn't tumble dry the item. |
|
| Lines inside the square explain how the item should be dried | - A curved line inside the top of the square means the item can be hung to dry - One horizontal line inside means the item should be dried flat - Three vertical lines inside means the item should be drip-dried. |
* Symbol credits: shooarts – Shutterstock
How often should you wash your clothes?
How often you should wash your clothes, bedding and towels is a source of constant debate between parents and children, not to mention those trying shared living for the first time.
Broadly speaking, you should aim to wash your bedding and towels every couple of weeks (unless they smell and clearly need to be changed sooner). But clothes are a little more complicated.
Some garments need to be washed after every use, whereas others can cope with being worn up to 10 times without being cleaned. According to Which?, this is how many times you can wear each item of clothing before washing it:
- Bras – Two to three
- Dresses – One to three
- Jeans – Six to 10
- Pyjamas – Three to four
- Skirts – Five to seven
- Sweatshirts – Five to six
- Swimwear – One
- T-shirt – One to two
- Underwear – One
- Workout gear – One.
But again, as with bedding and towels, these figures are just guidelines. If an item of clothing smells or is visibly dirty, it's best not to wear it until it's had another wash.
How to wash shoes in a washing machine
No matter how careful you are, it's nigh-on impossible to keep shoes free from scuffs – especially those fresh white creps.
Fortunately, some (but not all) shoes can go in the washing machine. Before you go chucking your £100 trainers in, here's what you need to know about cleaning shoes in a washing machine:
- Check if they're machine washable – Shoes made from animal-based materials like leather and suede generally can't go in the washing machine, and neither can those made from delicate fabrics like silk and satin. However, most trainers can be machine-washed. As ever, check the label on your shoes for the definitive answer!
- Clean your shoes yourself first – If there are huge chunks of dirt on your shoes, including the sole, remove these yourself first (if you don't like getting your hands dirty, an old toothbrush should do the trick). This will stop your machine from getting clogged up and help it attack the tougher stains more effectively.
- Put your shoes in a laundry bag – Shoes often have a lot of fiddly intricacies like laces or buckles, and these can catch on the inside of the machine. Placing your shoes inside a laundry bag should stop this from happening, although if you don't have one, an empty pillowcase works just as well.
- Wash your shoes with other items – Running a cycle with shoes in the washing machine can get pretty loud, to say the least. As long as your shoes aren't too messy (we're talking caked in mud, or dog mess...) and they can be cleaned on a similar setting, consider padding out the wash with some towels. You, your housemates and your respective eardrums will thank us!
How to save money on washing clothes
The average cost of a standard washing cycle is 24p. This may not sound like a lot, but in a student house of four or more people, plus the extra washes required for bed sheets and towels, the money can really start to add up.
To help you keep your energy bills down, here are a few tips for saving money on washing clothes:
-
Wash your clothes on a cold temperature
Nowadays, with all the developments that washing machines and detergents have seen, there's often no need to wash your clothes on much more than a 30°C wash. This should take care of all the cleaning required, and a lower temperature is not only better for the environment but means – you guessed it – less money spent.
The only exception to this would be if an item was heavily soiled, in which case a hotter wash may help clean your clothes more thoroughly than a standard 30°C cycle.
-
Use the eco-cycle setting

Credit: sfam_photo – Shutterstock
Most modern-day washing machines give you the option to wash your clothes in eco-mode. Although this cycle tends to last a little longer than others, it uses less energy and often less water too – ideal if you're on a water meter and trying to save money on your bill.
Using the eco setting on your washing machine is a great (and very easy) way to reduce your carbon footprint. And you can make further improvements to your washing by also getting eco-friendly products like non-toxic laundry tablets.
You can usually activate the eco setting by pressing a button on the front of your machine, but just beware that not every cycle is compatible with eco-mode. That said, your bog-standard mixed wash almost certainly should be, so just press the button and see if it lets you go!
-
Know the cheapest time to use your washing machine
Depending on your energy provider, your electricity may cost you less at night. You'll know if this applies to you, as your tariff will be called 'Economy 7' or 'Economy 10' (check your bill or contact your supplier if you're not sure). This means you get either seven or 10 hours of cheaper electricity every night.
While you're probably more likely to be on a standard tariff where electricity costs the same no matter when you use it, it's definitely worth checking.
So if you're on an economy tariff, the best time to use your washing machine is during off-peak hours, usually at night. Just show some consideration for the noise a washing machine can make and don't run it when everyone's trying to sleep.
-
Learn how to clean your washing machine
A clean washing machine is an efficient washing machine – both in terms of how little energy it uses and how well it washes your clothes.
You'll be most exposed to the sight of the detergent drawer, so there's no excuse for not keeping this clean (unlike the one we showed you earlier...). Nothing much is required here, other than removing the drawer from your washing machine and scrubbing it with some standard household cleaner.
As for the drum and the inner workings of the machine, a dedicated washing machine cleaner should do the trick. It's super easy to use, and while you should always check the specific instructions on the packet, it usually just involves pouring it into the detergent drawer and running a hot cycle.
Otherwise, just try to keep the door to your machine open when it's not in use, as this helps it to air and stops mould from growing inside (if your machine smells, this could be why). Oh, and every few washes, wipe down the inside of the door seal – all kinds of gunk can end up there!
Our list of cheap cleaning products includes a cheap way to make your washing machine cleaner. -
Only run full loads of washing

Credit: Andrey_Popov – Shutterstock
Not much explanation needed here! Unless you desperately need to wash something, or you simply don't have enough clothes to wait until your laundry pile is big enough to fill the machine, try to only run a full load of washing. It's better for your wallet, and it's better for the environment.
Washing two small loads will cost you more than simply washing one big load, although you should be careful not to overfill the machine. There should be a sticker on the front (or guidance in the manual) that states the maximum weight of washing your machine can handle, and exceeding that limit could cause it to break.
-
Wash whites and colours together
We touched on this earlier, but thanks to the improved efficiency of colder washes and aids like Colour Catchers, you can often get away with washing your coloured and white clothes together.
This, in turn, will mean you don't need to run a half-empty wash just because you don't have enough whites to fill the machine – and again, fewer washes equals less money spent.
-
Dry your clothes naturally
It's unlikely that your student house will come equipped with a dedicated tumble dryer, but what you might have is a combined washer dryer.
As handy as this might be, it doesn't take a genius to realise that tumble drying your clothes is more expensive than simply hanging them on an airer and allowing them to dry naturally.
And that's not to mention that some clothes can't be tumble dried anyway, so why not go the whole hog and just let Mother Nature dry everything? Just remember that, if you're not drying your clothes outside, you'll need to keep the room ventilated and heated to some degree, otherwise you can end up with damp developing on the walls.
A mouldy, broken washing machine and some of the worst damp you'll ever see – these were just two of the horrors inside the student house from hell.


